Additional Pages To Check Out

Monday, July 28, 2014

Natural Remedies - Basil (Ocimum Basilicum) - Part 1

There are so many types of basil to choose from, but in the post I'm not going to get into any specific varieties. I'm going to share some tips on growing basil, how to tend to and harvest it as it grows, some of the remedial benefits that basil has to offer, and how to prepare it for the applications of each. Since this is going to be too much information to try and cram into one post, I'll cut it into two parts. I'll cover the tips on growing, tending to, and harvesting it now, and I hope you'll come back for part 2 where I'll cover the remedial uses and how to prepare it for them. Since I'm sure you'll be using a majority of your basil for preparing sauces and other foods, I'd like to share a food rating chart that I pulled from a site called 'The World's Healthiest Foods' before we get into the other information.


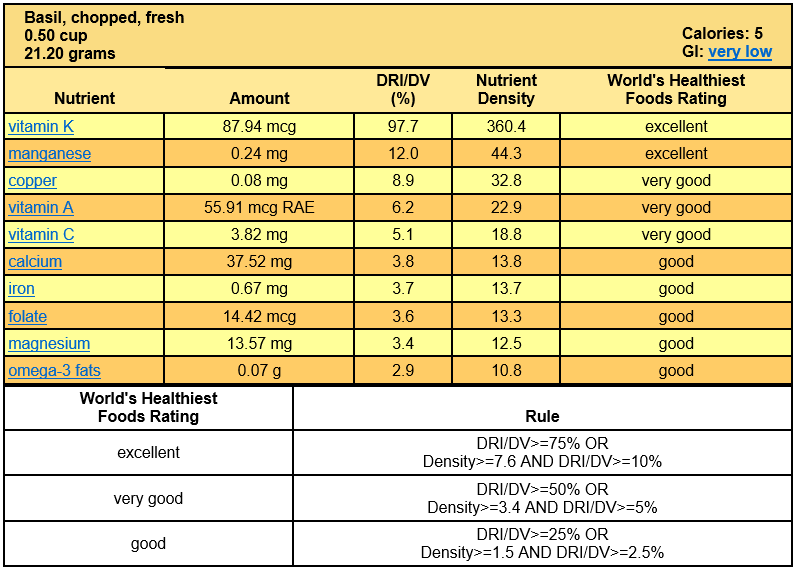
As stated in the chart above, these are the values of a half cup (21.20 grams) of fresh chopped basil. You can find a small bunch (usually about 6oz.) of fresh basil at almost any local grocery or big box store, but rather than paying close to a couple bucks for it, you could start growing your own from a pack of seeds for just about the same price, maybe less. It may be too late in the year to grow it outside depending on where you're at, but setting up a small windowsill herb box is always an option to growing any time of year. Just three basil plants that are properly cared for can provide about one to one and a half cups of basil leaves a week.

Wherever you decide to grow your basil, there are a couple things you'll need to take into consideration. Basil loves sunlight, so providing it with at least 6 to 8 hours a day is optimal. Choosing a south facing window will ensure that it receives the most possible natural sunlight in a day, you could also set up an area with grow lights to ensure that it receives adequate lighting if window space isn't an option. The other important thing to remember is that basil roots are very prone to rotting. You'll need to either choose an area outside with good drainage or use a container with holes in the bottom and a water catchment tray.

If you grow basil from seeds, be sure and cover them with between 1/4" to 1/2" of soil. They'll take anywhere between 8 days and 2 weeks to germinate, with an additional 2 - 3 weeks before you have the first true set of leaves. If you've planted the seeds too close together, you'll want to thin them out by either replanting them about 6" apart outside once the danger of frost has passed, or by sticking to two or three plants per 8" container. One of my neighbors told me that the pH levels of your soil are important, and that they should be checked every 4-6 weeks. She says that if the pH level is around 6.0, then you're basil will be just fine. I've never checked pH levels in my soil for any of the plants I grow, but I'm sure there is some sort of over the counter testing kit or something you could look into. She also claims that if you'll just use fertilizer at half strength as often as suggested on the package, this will help make sure the soil is good for the growing and you won't need to do any pH testing.

I've never used any store bought fertilizer. I have access to as much horse manure as I want to pick up, so that's what I use. It may or may not be doing the job, but here's what I do. Occasionally I'll go and shovel some manure from the oldest side of the poop pile, bring it home, and put about a 1/2 or 3/4 of a shovel full worth in a 5-gallon bucket and fill it with water. Every couple days I go out there and stir it around with a stick or something... I've even used my hand. No big deal. About once a month or so I'll fill my watering can with the manure water from that bucket and I'll water whatever plants I can until the there isn't enough water to scoop out anymore. You could try this too or buy fertilizer, it's really up to you.

In order for basil to grow well and keep producing the best amount of leaves, you'll need to harvest it often. Once there are five or six sets of leaves on it, you can start plucking them. The way I do it is to snip off the center shoot just above the second set of leaves from the bottom. If you aren't going to use it right away, you'll need to decide how to store it. Basil doesn't dry out well for me, it never does. It always turns black and the taste very noticeably fades. I believe it has something to do with the high water content in it. If you want to keep it as fresh as you can, keep the center shoot/stem and the leaves intact and put them in a glass or a vase of water just like you would fresh cut flowers. If you keep them like this on a counter and out of direct sunlight, they could stay green for almost 2 weeks.

Basil also freezes well. Make sure you rinse them off before preparing them. If you want to make it into a pesto or something before you freeze it, that's always an option. You could also pluck off the leaves and make them into oil cubes. Roll each leaf, slice them up into thin strips, and loosely put the strips into an ice cube tray. After that you can pour just enough olive oil in each section to cover the strips, and freeze it that way. After they're frozen you can transfer them into a freezer baggy if you'd like, or just keep them in the tray and cover it with plastic wrap.

You can also freeze the leaves whole. By this I mean you can just pluck the leaves off the stem, carefully rinse them off so you don't bruise them, and then dry them on a paper towel or in some sort of salad spinner if you want. Once they're dry, lay them out on a cookie sheet and stick them in the freezer for an hour or two. After that, take them out and loosely stick them in an airtight freezer bag, seal them shut, and stick them back in the freezer until you're ready to use them. Make sure you label the bag with the name and date for future reference. When you harvest more basil, I don't suggest adding the new leaves to the bag that's already been in the freezer. I would just start with a fresh bag every time.

I don't let my basil grow flowers, I pick from it far too often for it to do that. I still don't quite know how long basil will grow before it will just die off if you don't let it flower and go to seed either. Once you decide you're ready to stop using your basil plant and would like to get seeds for future planting, let it grow until it starts to blossom. Once the flowers are there, just leave them alone until they turn brown and the seed pods form. After that, you can pull the pods off and set them in a shallow bowl or something to dry out more. If you look inside the pods, you'll see the seeds inside. You can rub your fingers on them to help the seeds come out, or if you're patient, they'll fall out on their own. You'll need to store the seeds in a cool, dark, and dry area. Some say the freezer or fridge is fine, but I just keep all my seeds in individual baggies inside a jar and stick them in the pantry. You can check into which method is best for you, but when the seeds are stored right they could last for at least 5 years... some argue that basil seeds could last 10+ years, but I don't know that I would have any sitting around that long to test that time length.

Here is a simple video on How To Save Basil Seed by bsntechdotcom that you can watch if you're interested in seeing how it can be done.


 ***************************************************************************************************************

Don't forget to come back for the next post, it will cover the remedial uses for basil, and the applications for each. If you haven't subscribed yet, please consider doing so. Leave a comment if you have one, and share this with others who may find it useful. I'm still interested in finding similar blogs and sites too, so please share yours or your favorites in the comments below. Don't forget you can contact me personally through any of the options on the Contact Magpie page, I'm always open to suggestions for article content and interested in getting to know my blog's readers.


Thursday, July 24, 2014

My Thoughts On Gardening - Do You Think You Should Get Started Now?

If you're reading this, it's probably because you realize the importance of preparing yourself and your family for some uncertain future disaster. While I love trying to provide you with the informative posts and videos that will help you do this, along with showing you ways to survive after things have already gone bad, sometimes I'd just like to talk about things that are running through my mind. I decided to start a new section on the blog labeled 'My Thoughts.' There's not really going to be any how-to or informative type of content in it, it's just going to be my thoughts on certain things as they pop into my head. So if you don't mind, I'd like to yank at your ear for a couple minutes.

Have you thought about what you're going to do when your stock of food and supplies start running low? What if things haven't straightened themselves back out to a world we're more familiar with and you notice that you're getting down to the last bag of beans and just a couple cans of vegetables or something? I don't even want to think about all the worrying I would do if I ever seen my food supply starting to get low, there's nothing that scares me more than thinking I can't provide the next meal for my kids. I do some small-scale gardening right now so I can supplement what we eat and what I can add to the foods that I save for the future's unknown, but I think you should be doing the same. Have you thought about doing any gardening, or are you currently doing any right now just to make your food ends meet? Gardening should be everyone's backup plan, but you can't wait until there's only a few days worth of food left in your pantry to start. I think it would be a great idea to learn the ropes of it now if you aren't already familiar with gardening. Not only can this provide food, but it plays a big role in being able to provide yourself with herbal remedies too.

Although some plants (like radishes, green onions, and leafy greens) can start being picked from after about just a month of growing, most take a couple months or more to reach their peak. If you haven't tried growing any of your own produce, now is the best time to try your hand at it. Depending on where you live, it may be too late in the year to grow things outside from start to finish, but there are ways to work around this. You could always purchase a greenhouse, or make your own, to grow in all year long. Or if you have a sunny windowsill you can practice with some small indoor gardening. You may even be interested in setting up an area with growing lights and go that route, if my home was bigger I'd definitely designate a spare room to doing just that. I seen an article on an underground garden that you can grow in without any heating pads or anything too. You can check it out here if you'd like. If my yard were bigger I'd love to have one. However you choose to do it, just do it.

Growing food isn't a skill that everyone should automatically assume they have, it really does involve more than just throwing some seeds in dirt and hoping for the best. I found that out the hard way. The first year I tried gardening, I spent around $100 on seeds, potting soil, containers, and gardening tools just to reap nothing that I had sown. Not a single plant produced anything. In fact, not a single plant grew more than around three inches tall. I still to this day have no idea what I did wrong, but I assumed I just didn't have that green thumb that I noticed so many people in my area seem to have. I felt like adding gardening to my list of can't do's... I almost gave up. I tried a few different things after that, having some luck with some of them, none at all still with others. I do think that the place I moved into about a 16 months ago seems to be the place I was needing, because I have had the best luck here than anywhere else.

I continued reading lots of articles and watching video after video about everything regarding gardening after some of my failed attempts, and when I moved here I decided to give it a try again. I started with just some simple herbs. I don't really know how long herbal plants are supposed to grow before you need to replant, but I'm on well over a year with the same small window box that I regularly pick off for cooking and the thing just keeps growing and growing. This past fall I decided to try some potatoes in the front of my trailer, I was more than excited to see that they'd grown all through fall and winter. In March I dug up 39 potatoes that grew from just the five small potatoes I pulled out of a store bought bag that had sprouted some eyeballs. When I seen that they grew so well, I decided to try a small variety of other things to see what I could get to grow. I can proudly say I think I have the hang of it now, for the most part.

My yard isn't very big so I'm not growing huge amounts of crops or anything, but most of the seeds I did plant seem to be doing just fine. While I'm unsure about whether some of my current plants will grow to maturity so I can pick things from them, the potatoes, sugar snap peas, corn, lettuce, peppers, and tomatoes that we've been able to enjoy so far are rewarding enough. Not only did growing these from a low priced pack of seeds save me money, but it gives me a sense of security that if S ever does HTF, I'll be able to continue providing at least these things for my family. I encourage you to grasp onto a little piece of that security for yourself, start off small with just a few things like I did and see where it takes you. Even if nothing works the first crop around, don't give up. You'll figure it out soon enough and it'll pay off in the long run.

Now that I've shared a bit of my thoughts about gardening with you, please share some of your mind with me. What is your take on gardening? Do you think it's worth it? Have you done any gardening in the past, growing anything now, or are you planning on doing any in the future? If you do grow your own food or are thinking about it, what are your opinions on pesticides? Do you think they're a good thing, or are you against using them and would rather try an all natural alternative to keeping plants safe from all the crop terrorizing bugs? I know that some people would rather use them so they don't loose their crops, but others worry about the possibility of contaminating the food. I personally use the Sevin 5% dust because I lost over half of my first plants almost overnight to an army of squash bugs that appeared out of no where. I'd like to go the natural way, but that proved to not work for me. I'm personally stocking back on the stuff, if I may have to depend on only what I can get to grow in the future, I'm not taking any chances of loosing it all just because I'm worried about a little bit of pesticides on my plants. I'll just be sure and wash them well before eating them. What's your opinion on it? I'd love to know.


 ***************************************************************************************************************

 If you haven't subscribed yet, please consider doing so. Leave a comment if you have one, and share this with others who may find it useful. I'm still interested in finding similar blogs and sites too, so please share yours or your favorites in the comments below. Don't forget you can contact me personally through any of the options on the Contact Magpie page, I'm always open to suggestions for article content and interested in getting to know my blog's readers.


Monday, July 21, 2014

Collecting Rainwater - Resource, Money, and Life Saver

Next to oxygen, water is the most invaluable natural resource in the world. Without it, humans, animals, plants, and every other living thing would cease to exist. So whether you're paying for city water, have your own well, or you're pulling water from a spring, creek, or river near your home, there really isn't any room for waste. Buying or building your own rainwater catchment system, along with re-using gray water (we'll talk about gray water in a future post), is a great way to reserve water. Setting up a way to collect and harvest rainwater now will not only lower your water bill or help you use less water from your well or private water source, but it's also one of the few life saving ways to provide water in a post-disaster situation.

The obvious use for rainwater would be for gardening and watering your lawn, but when it really comes down to it, anything that you can do with tap water, you can also do with rainwater: showering and hygiene, washing laundry and cleaning, for cooking and drinking (make sure you read my post about water filtration and purification), watering meat animals and pets, and so on. I catch rainwater using nothing more than some buckets that I put out near the corners of my home and in a few spots in my yard before it rains so I have extra water for my gardening, but there's a lot of different ways to go about this. Depending on whether you want to collect just a bit of rainwater like I do or if you want to do it on a larger scale, there are a lot of options to choose from. Check into your current local laws before doing anything, and then think about if you'd rather create your own rainwater catchment system or if you'd like to purchase one that is pre-built.


Here are a few links to articles and videos to help you decide if making one yourself is right for you:


If you decide to buy a rainwater catchment system instead, here are my suggestions:


Like I mentioned, collecting and harvesting rainwater is illegal in some places. Before doing anything, you should go to USA.gov to be on the safe side and check the current laws and regulations for your location. I know in some places people are encouraged to collect rainwater, but in others you could get fined or receive jail time.
 
For more ideas on being self sufficient before disasters strike, be sure to check back in and click the 'Pre-disaster Sufficiency' label on the side of the page. There are a lot of things you can do now to provide day to day things in a cheaper and more environmentally friendly way. If you currently collect rainwater or have in the past, please share some details about what type of system you use, how long you've been doing it, and what you use your harvested rainwater for. I'd love to hear about your experiences with this.


 ***************************************************************************************************************

 If you haven't subscribed yet, please consider doing so. Leave a comment if you have one, and share this with others who may find it useful. I'm still interested in finding similar blogs and sites too, so please share yours or your favorites in the comments below. Don't forget you can contact me personally through any of the options on the Contact Magpie page, I'm always open to suggestions for article content and interested in getting to know my blog's readers.


Wednesday, July 16, 2014

Are You Familiar With Natural Remedies Yet? You Should Be.

This post isn't intended to persuade you to completely cut ties with all over the counter (OTC) and prescribed medicines, but more to encourage you to familiarize yourself with, and maybe even try your thumb at growing your own, remedial herbs and plants. There may come a day when doctors, hospitals, stores, and pharmacies aren't so widely available like they are today, so this is much more rewarding than just having something nice to look at in your yard, greenhouse, or window sill. Instead of adding more confusion to your life and trying to figure all this out at the last second, make yourself familiar now with which plants and herbs are medicinal and what they may help with.

I thought about all the natural remedies that I've heard about or used based on other people's suggestions, and wanted to make a decent list to start you off with. This surely isn't every single one, but it's a start. There are many uses for most of these, so this list will just touch on some of their healing properties. I'll conduct further research and come back in future posts with the specifics on the identification, growing, remedial uses and health benefits, and the applications (preparation) for each one in this list, along others that I learn about along the way.


Aloe Vera - cuts, burns, achy, joints/arthritis

Basil - helps with nausea, lack of appetite, and gas, also as a mild antiseptic and anti-inflammatory

Calendula (Pot Marigold) - antifungal, antiseptic, wound healing

Cat's Claw - boosts immune system

Cayenne - prevents blood clotting, relieves migraines, tooth pain, and joint soreness, can be used on snake bites, wounds, and sores, and can bring relief from flu symptoms

Chamomile (German Chamomile) - calms colic in children, also helps upset stomach, calms nerves, and can be used as a sedative

Cilantro (Coriander) - digestion, also cleanses body of metals and toxins

Cinnamon - since about 99% of bacteria and viruses can't live in the presence of it, this would be good for an antibacterial/antiviral

Dandelion - increases ovarian hormones, calms PMS, and helps with menopause

Eucalyptus - reduces swelling

Fennel - eases stomach muscles, aiding in digestion

Feverfew - lowers fever (thus the name), headache and migraine relief, and can relieve the symptoms of arthritis

Foxglove - wound healing (topical use only, could be fatal if ingested)

Garlic - body detoxification, immunity enhancer, lowers fats in blood, fights infections, helps yeast infections, helps with asthma, sinusitis, circulatory problems, heart conditions, and possibly even cancer

Ginger - anti-inflammatory, nausea, motion sickness, indigestion, and circulatory problems

Lavender - helps with insomnia, alleviates stress, may also help heal cuts, wounds, and sores

Lemon Balm - can reduce stress and anxiety, helps fight off the herpes simplex virus and others that are similar to it, calms stomach spasms, and can be used to soothe and heal bites and stings

Mullein - soothes cough, helps heal bronchial/respiratory infections

Oregano - can prevent inflammation, also has anti-oxidants that could prevent chronic diseases like cancer

Parsley - can fight kidney and bladder infections, used as an iron supplement, can boost energy and circulation, and can be used as a diuretic

Peppermint - relieves vomiting and indigestion, also soothes sore muscles

Rosemary - helps the brain receive more oxygen, giving energy and sharpening the memory, also used for muscle pain relief and digestive problems

Sage - astringent and antibacterial properties that can heal mouth, gum, and throat inflammation, may also be able to stop bleeding

Sorrel - helps jaundice, can be applied to ringworm, sore throat relief, and lower fever

Spearmint - energy booster

Thyme - relieves mild diarrhea, has antiseptic and antibacterial properties that can prevent colds and flu

Turmeric - may slow rheumatoid arthritis


Just like OTC and prescribed medicines, natural remedies have guidelines too. Not only do you need to be 100% sure that you can properly identify the plants and herbs you're about to use, but you need to know which parts are needed. Some things are great for topical remedies, but could be fatal if ingested, so knowing the application guidelines is crucial. Natural remedies can also have some side effects depending on the user. If you're allergic or sensitive to any specific herbs or plants in their natural state, you clearly shouldn't attempt to alter any part of them into a medicinal application. Like every other OTC and prescribed medicine, you need to be familiar with dosages and what they can and can't be paired with. Some aren't intended for children or the elderly, and just like every other medicine, pregnant women need to take extra caution.


 ***************************************************************************************************************

For more guidance on remedial herbs and plants, their identifications, applications, possible side effects, and so on, be sure to check back in and click the 'Natural Remedies' label on the side of the page to find future updated information. If you have any experience using any natural remedies, please share some details in the comments below. I'm sure there's loads more to add to this list and not only will it help anyone else who's interested in this, but every bit of information that I can learn from you is much appreciated. If you haven't subscribed yet, please consider doing so, leave a comment if you have one, and share this with others who may find it useful. I'm still interested in finding similar blogs and sites too, so please share yours or your favorites in the comments below.

Wednesday, July 9, 2014

Introduction To Clay Pot Refrigeration

Remember when I said something about clay pot refrigerators in the last post? Let's go over them now. I'm going to tell you how these are made, what makes them work, and then share a couple links to articles and videos about them. I don't think these would be good for anything more than storing fresh produce or maybe for cooling drinks, but being able to lengthen the fresh state of fruits and vegetables alone makes it pretty handy. I don't currently have one, but as long as I can make my way through my to-do list, I should have one in the near future that I can share progress, updates, and notes about. Let's get started.


You'll need:

1 large clay or terracotta pot (one with no holes in the bottom, or you'll need to close them)

1 smaller clay or terracotta pot (again, no holes)

Sand

Water

1 Towel


What to do:

*When you choose your pots, make sure that the smaller one will fit inside the large one. There will need to be a couple centimeters of space in between the pots.

*Place enough sand in the base of the large pot so that when the smaller one is set inside, the tops of both pots are level.

*Fill the area in between the small and large pots with sand, making sure to fill it all the way to the top.

*Pour cool water into the sand, giving it plenty of time to absorb. Gradually add water until the sand can't hold any more, being careful not to overflow it into the smaller pot.

*After your clay pot fridge is set up, wet your towel in cool water, squeeze out as much of the excess water as you can, and lay it across the top so it can start cooling your 'fridge' down.

*Check the temperature inside with either a thermometer, or just your hand, until it cools down. After it cools, you're ready to put in your fresh produce or whatever else you decide to keep inside.


This clay 'fridge' works through evaporation. As the water is evaporated from the sand, it pulls the heat from the inner pot with it.. kind of like when your body sweats and you feel cooler. If you keep the pot in a dry climate and allow it to have the complete outter surface ventilated, without sticking it in some corner where the surface is blocked from air flow or anything, it'll work best. If it's in a humid climate, the pots won't cool so easily either, so sticking it in a root cellar or something is also a no go.

Like I mentioned, I don't know that this would be good for anything other than produce or drinks, but if the temperature was monitored and found to be stable at fridge-like temperatures, I don't see why other things couldn't be stored in it. The sand will need to be checked a couple times a day to make sure it keeps the moisture needed to work.

If you want to see how one is made and watch temperature checks on half-hour intervals, you may want to watch

 Zeer Pot Fridge: Cool your food or drinks with no electric needed

You can also check out MixCatCom's channel for more DIY videos


If you're interested in reading more about these, you can click through these links:

Off-Grid SHTF Survival: Ancient Technology For Refrigeration

Zeer Pot Fridge


There's a lot of articles and videos on these, but nothing really covers anything new or different from everyone else's content. It's all a very basic concept.


 ***************************************************************************************************************

I'll answer any questions to the best of my knowledge if you have them, and I'd also love to read your comments and thoughts. Don't forget that I'm trying to find other blogs, sites, and YouTube channels with similar content that I may not have stumbled across yet, so please share yours (or your favorites). Please take a second to subscribe if you haven't and don't forget to share this with others who may find this useful.


Saturday, July 5, 2014

Introduction To Drying And Smoking Meats

Have you thought about what you're going to do if/when the grid goes down and there's no power to run a fridge or freezer to store meat in? Alternative options like backup generators or planning to use an RV fridge are great ideas, but they won't last forever. We'll talk about clay pot refrigerators in a future post, but it's not really something that's good for holding big amounts of anything inside and fresh meat doesn't last too long when just refrigerated anyway. Everyone should practice and familiarize themselves with drying meat. In this post I'm going to cover two ways for drying meat that have been practiced for centuries, by using nothing more than air and the sun or smoke. Neither process requires any electricity and each way will safely prepare meat for storage without refrigeration for quite some time.

The microorganisms that spoil meats need a certain level of moisture in order to grow. Drying meat drops the moisture below the level needed, making the growth of the microorganisms discontinue. Just about any lean meat can be dried. Beef, buffalo, deer, goat, and fish are probably the most common and best choices, pork should be avoided because of its high fat content that can make it go rancid much quicker. The nutritional properties of meats after they're dried remain the same for the most part, and the process itself is fairly simple. Dried meats can last for months without refrigeration, I read that in some cases it may be stored for years when packaged right... when attempting to save meats that long, they'll need to be thoroughly inspected for foul smells, discoloration, or other signs of spoilage before being consumed.

Since drying meat is just a matter of exposing the meat to the sun and air, or air and smoke, to make it lose tissue moisture, the fresher and thinner the meat is sliced, the safer the process will be. Meat needs to be de-boned, trimmed, and then sliced into thin uniform strips or thin steak-like cuts for each batch that is dried. If the meat has been frozen at any time, you'll need to make sure that it is completely thawed or the drying process will be uneven resulting in quickly spoiled meats. Additionally, salting meats before either drying process helps in a couple ways. It'll not only add some flavor and help pull moisture out of the meat, it also makes the surface of meats unattractive to insects that feed on the moisture excreted from the muscle tissue. Only salts without additives (like iodine) should be used. Then the meat is suspended with hooks, loops, or clips from racks or ceilings, or it can be set flat on drying racks. No piece of meat should touch another to ensure the proper air circulation needed to dry it out.

Centuries ago, people hung meats out to dry in the sun, without any protection from the elements. This is still an option today if you have the right climate, but I'm not sure I would attempt this procedure and then just cross my fingers that dogs or dirt wouldn't get to it. Solar dehydrators and smoke houses are probably the best options. Remember that we aren't covering the electric food dehydrator method because we may not always have electricity. I looked around trying to find the best written step by step directions for building your own solar dehydrator and smoke house, just to be slapped with seemingly endless results. After sifting through them all, I believe I have found the best step by steps to share. I'll share links to the articles and videos below. If you don't have time to thoroughly look them over now or if you'd like to refer back to them later, bookmarking the links would be a good idea.


*To make your own solar dehydrator, click below. The article, although not my own, is very thorough and includes not only the materials needed, but also step-by-step instructions for constructing your own solar dehydrator.

How To Make A Simple Solar Food Dehydrator

Be sure and click on to page 2 after you looked this over, it goes over the steps to making the shelving that you lay the meat on to dry.Watch the Simple DIY Solar Food Dehydrator video to go along with the article, and you can always check out more about To Do It Yourself World by clicking the name.


*For instructions on building a smoke house, click the link below. This content isn't mine either, but the content is probably some of the best instructions I found for making a smoke house.

DIY Smoker- How To Build A Smokehouse From Pallets for Less than $100

After you've looked over the article, watch the video that goes along with it. DIY Smoker: How To Build A Smokehouse From Pallets For Less Than $100. You can check out more about DIY Ready - Projects & How To by clicking the name.


***************************************************************************************************************

Have you ever dried or hard smoked any meat? I'd love to hear your stories, or just your comments if you have any. I'm interested in checking out other blogs, sites, and YouTube channels that I may not have stumbled across yet, so please share yours (or your favorites). Please take a second to subscribe if you haven't and don't forget to share this with others who may find this useful.


**********
Here's an offer for fellow prepping and survival bloggers, or sellers of prepping and survival supplies. I have ad spaces on this blog that you can rent, I would even consider adding a page for advertisement alone. If you're interested, please send an email to messagemagpie@gmail.com to discuss options, or for more information. You must include the phrase 'Ad Space On Magpie Prepper' in order for me to open the email, and please do not include clickable links in the body because it may be automatically sent to spam. Once I receive the initial message, I can add your email to my contact list ensuring that I'll receive future emails from you.
**********

Wednesday, July 2, 2014

Introduction To Home Canning

I previously posted content about storing foods in BoPET (Mylar-type) bags and oxygen absorbers, the kind of food storage I'm going to talk about now is canning. I've done some canning before, but I'm no where near a 'pro' at it. This post isn't just to help others learn about canning, I'm using the research for writing this to help me understand it better too.  In a mini science nutshell, canning gives fresh foods a longer shelf life because it removes oxygen, prevents mold and bacteria from growing, and it kills off botulism spores before they can grow into the botulism toxin. I'm not personally sure how long home canned foods are good for because everything I've ever canned gets eaten within a few months, but quite a few informative articles I've read suggest that the shelf life is anywhere from one to two years. That's no where near as long as store bought canned foods last, but at least you'd be healthier without all the preservatives and it's a great addition to your food storage. Be sure to check out the bottom of this post when you finish reading it, I have some some general questions of my own that you may be able to answer, please leave any questions you may have in the comments so we can discuss those too. I'm also going to share links to articles I read for my research, direct you to a couple good tutorial videos, and share a few good recipe sites with you.

Let's start with the basics of canning, starting with the jars and lids. The glass jars, like Mason jars, come in an assortment of sizes - half pint, pint, pint and a half, quart, and half gallon. I usually can in the half pint and pint size jars, that way I know the contents will be used before they go bad once I open them. The mouth (opening) of the jars are threaded and comes in a standard size of two and three-eighths inches or in a wide mouth size of three inches. This sizes don't make much of a difference, but when it comes to re-using the jars you'll need to make sure you get the right size lids. The lid comes in two pieces - a flat metal lid and a threaded metal screw-on band that holds the flat lid in place. The flat lid has a resin type compound that'll soften up during the canning process. The compound will slightly melt around the mouth of the jar, forming a gasket type seal as the heat escapes, taking the oxygen with it. These jars have an indefinite life, as long as they don't become chipped, cracked, or broken in any way. The flat lids on the other hand, may only be good for five years from the manufacturer date if new. I've tried to read around about re-using the flat lids, or if there's a compound I can buy to re-use them, but all information leads to no. I've seen boxes of wax in the canning isle at Walmart, but I'm not quite sure if it's for canning lids, or something else.

Before starting the canning process, all the jars and lids need to be cleaned and sterilized. It's a fairly simple procedure. (1) Thoroughly wash and rinse each jar, flat lid, and band with hot soapy water. (2) Choose a pot that is deep enough to completely set the jars inside with the opening facing up. (3) Add enough water to the pot to completely fill and cover each jar with at least 2 inches of water. (4) Using high heat, bring the water in the pot to a boil and let it stay at a rolling boil for 10 minutes. This time will vary with higher altitudes. (5) After the water has boiled for the necessary time, turn off the heat and carefully drop in the lids, along with the grasping end of the tongs you will be using. (6) The lids and tongs need to sit in the hot water a minimum of 10 minutes, but can be left for longer. Don't take the lids out until they are ready to be put on the jars. (8) To be sure that the jars stay sanitized until the process is finished, the jars need to be lifted out of the pot with the tongs, dumped out, and then set mouth side up on a clean paper towel or towel. You can let the jars sit for a minute or so before actually filling them, but the filling will need to be done as soon as possible to ensure that the jar doesn't cool. Pouring hot foods/ingredients into a cool jar could cause them to crack or even burst.

Now that the basic information for the jars, lids, and their sterilization

is out of the way, let's talk about canning methods. There are two different methods to choose from, pressure canning or in a boiling water bath. I don't personally have any hands on experience with the pressure canners, but since I read up on them I'll try to explain. A pressure canner is a heavy-duty kettle type piece of equipment with screw clamps, a vent, and a way to monitor and control pressure. Before each use, you'll need to clean, inspect, and assemble the equipment, being sure not to get the gauge wet or bump it around. The pressure gauge should be checked before each canning season and from what I understand, you should be able to have this done at your local county extension office. As far as the step by step directions go for using a pressure canner, you'll need to thoroughly read the instructions manual that comes with it and then save it for future reference. Now for how it works. Water comes to a boil at 212 degrees F, but pressure canners have the ability to bring the food contents inside the jars to 240 degrees F or higher. Since plain vegetables, soups, animal products, and any other low acid foods with a pH level of 4.6 or above need a minimum of 240 degrees F to properly eliminate botulism, pressure caning is the only safe method to use.

The other canning method, and the one I 'm pretty familiar with, is a boiling water bath. Water bath canning is done with nothing more than a deep pot with a lid, and a rack that will set down inside the pot. I personally use a 15.5 quart sized stock pot that came with a steam tray that sits in the bottom, I think I paid around $20 for it when I bought it. If you can foods in larger quantities, you can find much larger pots than the one I have. Since botulism spores can't grow into the botulism toxin in acidic foods, water bath canning is great for acidic fruits, pickled vegetables, jellies, jams, and any other food that have, or can be altered to have, a pH of 4.6 or less. The pH can be brought to needed levels with additions of citric acids like lemon or lime juice, or vinegar. When you are preparing the pot for the canning, you'll need enough water to ensure that once the \jars are lowered in, they will be covered with about 2 inches of water. The tops of the jars should never be above the water at any time once the process begins. Depending on the contents you're canning, there are guidelines for head space (the space between the contents and the lid) and the time they need to be in the boiling water. If the water stops boiling for any reason, bring the water back to a boil and restart the timer for the processing time. Once this time period is complete, turn the burner off or remove the pot from the heat and leave the lid on for about 5 minutes before opening it. Letting it sit for 5 minutes gives a higher success rate for the seals and allows the contents to settle before you remove them.

Using tongs, take the jars out of the pressure canner or the boiling water bath, and set them on a towel to cool. A cool counter top could shock hot jars causing them to crack, or maybe even burst. Make sure you pick a good place where they won't be in the way because they should cool over night at least. I like to leave them for at least 24 hours and then make sure the seals took right before I store them away. I do a simple test by pushing on the center of the lid. If it doesn't pop up then the seal should be fine. After that test passes, I carefully remove the screw on lid band and grasp the edges of the flat lid, carefully picking up the jar about an inch or 2 to make double sure the seal took. That's the extent of my seal testing, but according to a few things I've read, you can also check the seal by tapping a spoon on it. I guess you can tap the bottom of the spoon on the top center of the lid. If it makes a higher pitched ping sound then they're sealed correctly, but a dull sound could mean they didn't, unless there's food touching the inside of the lid, which will make a dull tap sound anyway... a little weary on this testing method, so I'll just stick to my regulars.

You may notice that the exterior of your jars seem a bit cloudy once they finish processing too, especially if you used tap water. Even if your tap water isn't really hard water, the smallest traces of lime and other minerals can leave the exterior of your jars mucked with mineral deposits. You can add a cup of white vinegar to the water you submerge the jars in before it's hot. This will keep your jars crystal clear on the outside and it'll make the pressure canner or pot easier to clean. Having a chalky looking exterior doesn't effect the quality or safety of the contents in it, but sometimes it feels strange (to me) pulling out a cloudy jar. If you already have some cloudy jars because you hadn't added the vinegar on previous canning sessions, you can clean them off with vinegar too.  I've read some suggestions about submerging the jars into warm water that has vinegar in it, but I can't help but feel like if I stuck jars that already cooled into hot water again, it may mess up the seal or something, but I could be wrong. I just dip a clean hand towel in white vinegar and wipe it off, then rinse the whole jar in cool water and dry it. Even though the crystal clean appearance on the outside of your jar makes no difference as far as quality or safety, jars that are sticky or have other food residues on the outside do need wiped off to avoid attracting ants or any other pests.

Once all your jars are properly processed, wiped off if needed, cooled, and the seals are checked, it's time for you to put them away somewhere. Be sure and write whatever food the jar contains and write the date that you canned them. I always write it all on the flat lid so I can re-use the jars for future canning without them being marked up already. Storing them without the screw on band in a dark, clean, and dry place is best, as long as the temperature of the area keeps between 50-70 degrees F. I just put mine in the pantry. Remember to put the newest jars in the back of your stock and pull the older ones forward so they are stored for first in - first out use, just like with everything else that has an expiration date. Again with the shelf life. I've never had anything that I canned last more than a few months before it was eaten, but some research leads me to believe that home canned foods are good for a year for sure, possibly up to 2 years depending on the contents and the atmosphere they're kept in. Now for some telltale signs of spoilage. If you see any leaking, bulging, or swollen lids, or if the jar has cracked, chipped, or broken, throw it away without opening it. If you open a jar because you don't notice any of the previous signs that they went bad and any foam or liquid spurts out, throw it away. Clean it up any spills with a diluted bleach water to make sure you get rid of any botulism or other bad bacteria. If no liquids spurt out but the contents are discolored, smell bad, or are moldy, throw them away too. Never taste any home canned foods to make sure they're good or not. Even the smallest taste test that contains botulism toxins can be deadly.


****************************************************************************************************************


Now I have some questions of my own, let's see if you can answer any or just discuss them with me in the comment section below:


Do you personally know of a longer shelf life for any specific home canned foods passed the 2 year mark? If so, what was the shelf life and what were the contents of the jar?

Do you know of a way to re-use the flat jar lids?

Have you seen the brick of wax in the canning section at Walmart, or any other store? If so, is it for canning and have you ever tried it?

Would you trust re-using the lid if you were able to scrape off the old compound and put on a new compound?

Do you have another way to check the seal on your lids?

What are some of your favorite things to can?

Have you canned bacon or heard of anyone who has?

Have you canned any other meat? If so, what kind?

What questions do you have?


****************************************************************************************************************

Before I go, I want to share some links with you. I didn't pull anything word for word from these, but this post was partially summarized through some of these. I do not own any of the content or videos in the following links.

General Canning Information

Boiling Water Bath vs. Pressure Canning

Safe Water Bath and Pressure Canning

National Center For Home Food Preservation

Cooperative Extension System Offices

Ball - Fresh Preserving

Canning 101 - video

Canning 101 Pressure vs. Water Bath - video

Canning, Pickling, and Preserves 101 - recipes

Recipe Index - recipes

I hope you enjoyed this post. Please be sure and subscribe if you haven't already, answer some of my questions if you can and ask any that you have, leave a comment if you have one, and share this with others that may find it useful. Check back in a couple days to see the next food storage method on the list, it's a good one. Until then...